
This particular photo shoot is of my 85 Ultra-Lite. It is very similar to much of the Taurus double-action revolver line. The official Taurus revolver owners manual has parts diagrams for many Taurus revolver models. Find it here - http://www.taurususa.com/pdf/revolver-manual.pdf
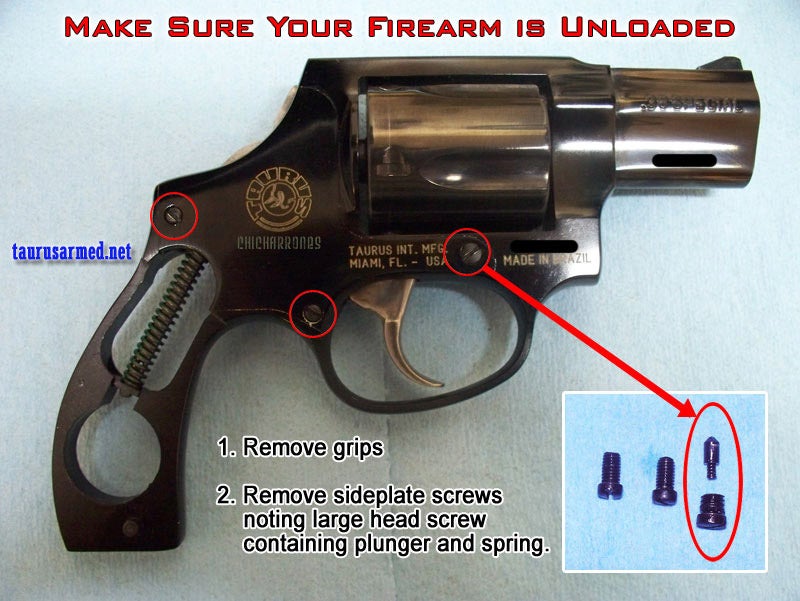
Before starting your own tear down be sure to UNLOAD YOUR FIREARM and get a decent set of gunsmith screwdrivers. Here is an affordable set available at many stores that sell guns. B-Square 31-Piece Professional Gunsmith Screwdriver Set
Note: The photos are fairly large. If you have dial-up internet, just walk away and get a cup of coffee. The photos should all be loaded when you come back.")
I omitted the grip removal procedure to save photo space. Different grips come off in different ways. The model 85 has a single screw on the right side of the gun. Remove the screw and pry the grip halves off the grip frame.
![Image]()
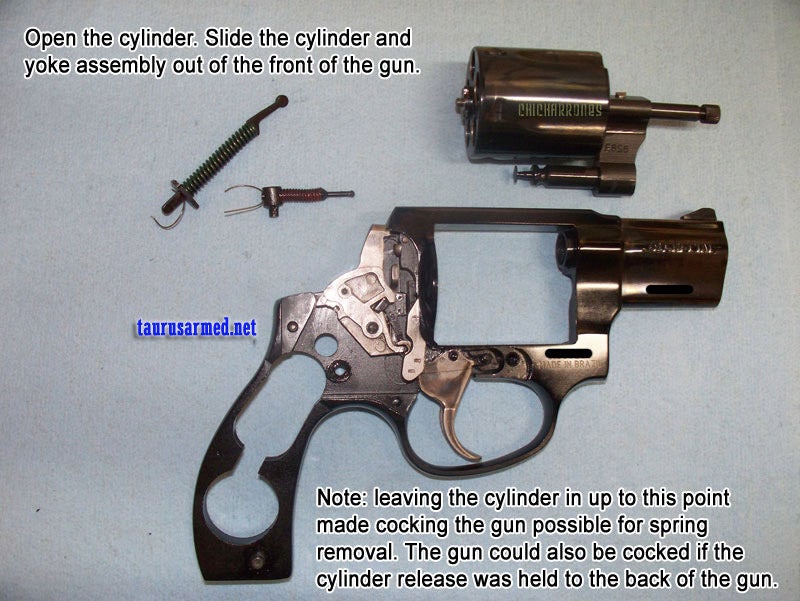
NOTE: The photo below is not the traditional method of removing the side plate of a revolver. It is a convenient way to remove the side plate since there is a hole in the frame allowing access. Not all revolvers have this access. Be sure to do a search for videos showing how to remove the side plate from a revolver. Prying the side plate off is NOT recommended and can damage the frame or side plate.
![Image]()
![Image]()
![Image]()
![Image]()
![Image]()
![Image]()
Note: The use of fired (empty) cases inserted into the chambers will provide additional support for the extractor star when you unscrew the extractor rod.
Photo below: H= Extractor, I= Extractor Rod, J= Cylinder Stop Plunger with Spring
![Image]()
![Image]()
![Image]()
Photo Below: You can also remove the cylinder release assembly if you want. It is held in place with one screw.
K= Bolt Spring, L= Thumb Piece, M= Thumb Piece Screw, N= Bolt
![Image]()
![Image]()
Reassembly is pretty much the reverse of disassembly.
To reinstall the cylinder onto the yoke just press it together with your hands until it snaps together. There should be a little spring loaded play between the cylinder and yoke.
The photo below shows what the trigger assembly looks like from the other side when put back together.
![Image]()
After getting the internal parts back in the revolver frame, be sure to cock the gun one more time to hold the hammer and trigger springs so you can remove the pins or wires that you put in to hold the springs on the center pins. Remember to reinstall and close the cylinder/yoke assembly to allow cocking.
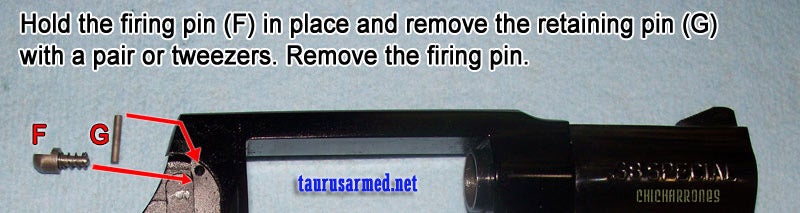
When reinstalling the side plate, the top portion has a tab that fits into the frame before closing the bottom of the side plate. If the side plate tab won't go into place, be sure the firing pin's retaining pin is fully installed. The bottom portion of the side plate should press into place with a little pressure.
DO NOT LOAD YOUR GUN!
Be sure to check how the gun operates mechanically. Check the hammer cocking, trigger pull, cylinder rotation, cylinder lockup, and cylinder opening. If you find that you cannot pull the hammer back, remove the side plate and check the hammer spring center pin. It can be accidentally reversed and jam against the trigger spring center pin. See the third photo to check.
IF YOUR GUN IS MALFUNCTIONING, TAKE IT TO A GUNSMITH FOR REPAIR!
EDIT: If the cylinder won't close properly after reassembly you may have a spacer, shown in the linked post, installed backward. Thanks to Sunset_Va for discovering that! Here's his post.
http://www.taurusarmed.net/forums/smithing/22219-taurus-revolver-disassembly-pictorial-guide-4.html#post284801
Sunset_Va's photo

Note: The revolver in this pictorial had its hammer modified for double action only after these photos were taken.
Here's a PDF file version - http://www.taurusarmed.net/forums/members/4403-albums457-picture19138.pdf
Before starting your own tear down be sure to UNLOAD YOUR FIREARM and get a decent set of gunsmith screwdrivers. Here is an affordable set available at many stores that sell guns. B-Square 31-Piece Professional Gunsmith Screwdriver Set
Note: The photos are fairly large. If you have dial-up internet, just walk away and get a cup of coffee. The photos should all be loaded when you come back.
I omitted the grip removal procedure to save photo space. Different grips come off in different ways. The model 85 has a single screw on the right side of the gun. Remove the screw and pry the grip halves off the grip frame.
NOTE: The photo below is not the traditional method of removing the side plate of a revolver. It is a convenient way to remove the side plate since there is a hole in the frame allowing access. Not all revolvers have this access. Be sure to do a search for videos showing how to remove the side plate from a revolver. Prying the side plate off is NOT recommended and can damage the frame or side plate.


Note: The use of fired (empty) cases inserted into the chambers will provide additional support for the extractor star when you unscrew the extractor rod.
Photo below: H= Extractor, I= Extractor Rod, J= Cylinder Stop Plunger with Spring

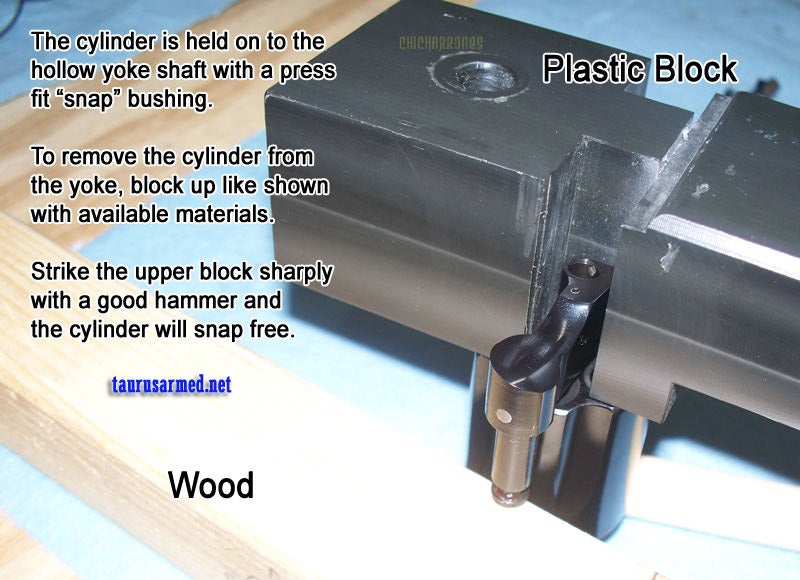
Photo Below: You can also remove the cylinder release assembly if you want. It is held in place with one screw.
K= Bolt Spring, L= Thumb Piece, M= Thumb Piece Screw, N= Bolt

Reassembly is pretty much the reverse of disassembly.
To reinstall the cylinder onto the yoke just press it together with your hands until it snaps together. There should be a little spring loaded play between the cylinder and yoke.
The photo below shows what the trigger assembly looks like from the other side when put back together.

After getting the internal parts back in the revolver frame, be sure to cock the gun one more time to hold the hammer and trigger springs so you can remove the pins or wires that you put in to hold the springs on the center pins. Remember to reinstall and close the cylinder/yoke assembly to allow cocking.
When reinstalling the side plate, the top portion has a tab that fits into the frame before closing the bottom of the side plate. If the side plate tab won't go into place, be sure the firing pin's retaining pin is fully installed. The bottom portion of the side plate should press into place with a little pressure.
DO NOT LOAD YOUR GUN!
Be sure to check how the gun operates mechanically. Check the hammer cocking, trigger pull, cylinder rotation, cylinder lockup, and cylinder opening. If you find that you cannot pull the hammer back, remove the side plate and check the hammer spring center pin. It can be accidentally reversed and jam against the trigger spring center pin. See the third photo to check.
IF YOUR GUN IS MALFUNCTIONING, TAKE IT TO A GUNSMITH FOR REPAIR!
EDIT: If the cylinder won't close properly after reassembly you may have a spacer, shown in the linked post, installed backward. Thanks to Sunset_Va for discovering that! Here's his post.
http://www.taurusarmed.net/forums/smithing/22219-taurus-revolver-disassembly-pictorial-guide-4.html#post284801
Sunset_Va's photo

Note: The revolver in this pictorial had its hammer modified for double action only after these photos were taken.
Here's a PDF file version - http://www.taurusarmed.net/forums/members/4403-albums457-picture19138.pdf


